As they enter the courtyard, the ghosts become hostile as the temple wards reactivate (+6 bashing attacks with their swords, 3 corpus, take half damage from nonmagical attacks, two new ones enters combat each round until they leave the area or defeat 13) - roll a 1d4 for each one slain, on a 1 the players can pick up ectoplasm from the creature's remains. Ectoplasm has two alchemical uses (Toxicity and Double Magicka Regeneration - so gain 2 rather than 1). Remember that an alchemical ingredient cannot be used with itself so the players, thus far, won't be able to combine them with anything. If the Nord, Hamasel the Innocent, was allowed to journey with them than she will avoid attacking any enemy ghosts by claiming that she didn't believe her sword could damage the ghosts.
Gathwen
Destruction Staff of Trifling Flame (7 dice)
(does bashing damage to Dunmer)
Initiative 6
Speed 10
Defence 5
Health 7
Health 7
Magicka 10
Novice Robes of Conjuration
Novice Robes of Conjuration
Gathwen can temporarily disrupt the Scorpion and Spider Wards which are on either side of the tomb's entry area though she must be escorted and protected while doing so (takes her 3 rounds to disrupt one ward as she has to head up the stairs first to find it). Once disrupted, the main entrance to the catacombs (a trapdoor on the western side of the courtyard) will open and they can enter the temple itself.
Well, after they have defeated three skeletons (+5 bashing attacks with their swords, 3 corpus) that are just within the trapdoor and step out once it is opened. Again, roll a 1d4, on a 1 give them bonemeal from the skeleton (-1 Stamina rolls; Resist Fire - i.e. take only bashing damage from flame).
The Catacombs consists of a large room with a simple puzzle along one wall. There are four pillars with etchings on them; each pillar has a different symbol corresponding to a phase of the moons. To proceed, activate the pillars in order: New, Waxing, Full, Waning. They will light up if the correct sequence is followed; if not, you will get a mild shock (but no damage).
Once activated, they can step out into an outdoors area where they will be immediately set upon by Kottami Sabletongue awaiting any possible intruders who will fight them. If Hammasel is armed and present, she will now turn on the PCs.
Kottami Sabletongue
+0 Steel Sword (+6 dice)
Initiative 4
Speed 10
Defence 5
Armour 3
Health 9
Armour 3
Health 9
Amulet of Stendarr
(+1 Health Trait)
Iron Armour
Hammasel the Innocent
As equipped by players (+6 dice)
Initiative 4
Speed 10
Defence 5
Armour 1
Health 8
Armour 1
Health 8
Amulet of Dibella
(+1 Socialise Trait)
Rawhide Armour
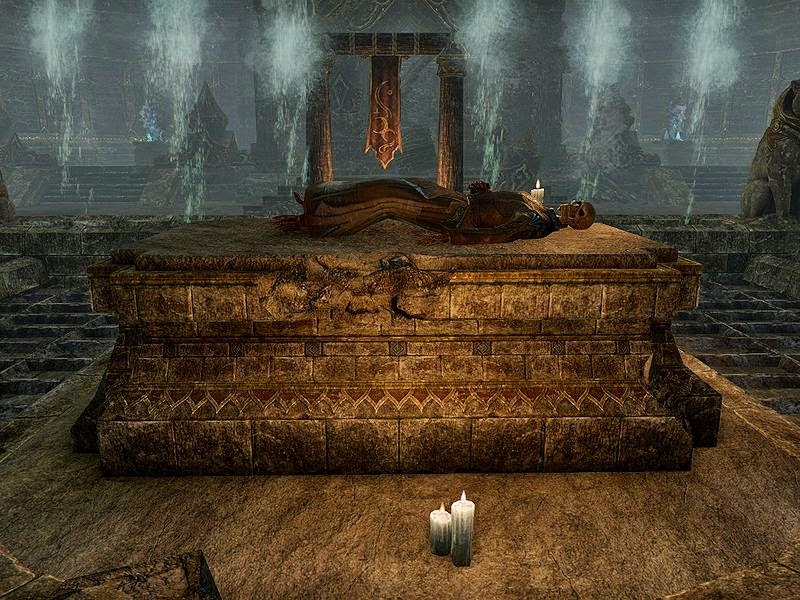 |
| Uldor's tomb ... Rurelion's new sleeping place. |
Finally down the steps off the pedestal and past the bone piles, the PCs can find a set of stairs that lead down into the Great Hall (which is empty) and then move through another set of steps into Uldor's tomb. Inside they will find Galydasea Krevyn hurriedly removing the tears of the two moons from the four pedestals, having heard the battle with the other two in the other room. She will have removed 1 tear for every three rounds that has passed since the battle commenced so if the battle (and any following conversation) took twelve rounds, she will have removed them all.
Galydasea Krevyn
Destruction Staff of Trifling Frost (6 dice, 17 yards)
(does bashing damage to Nords)
Initiative 6
Speed 11
Defence 5
Health 7
Health 7
Magicka 12
Minor Health Potion
Amulet of AzuraMinor Health Potion
(+1 Magicka Trait)
Ring of the Mage
(+1 Magicka Trait)
Novice Robes of Alteration
The PCs will know if the ward is still sealed as spouts of water surround Uldor's body and the possessed Rurelion also lies against the stone slab. Rurelion will have a tearful moment with Gathwen before directing the PCs to stop Evuliban from removing and destroying the Mourning Stone which was placed in the Central Ruins.
The PCs must then hurry into the Central Ruins where they will find Evuliban dressed in the full armour of a First Auridon Marine Captain (female Altmer), calling herself Artriel, and will explain that the Dunmer fled and the rest of her squad is in pursuit (Subterfuge 7 dice). He will attempt to send them off in a wild direction so he can finish his assault on the Mourning Stone. If confronted, the illusion breaks and the Dunmer snarls that: "Uldor will wipe this island clean and then be a blight upon the Khajiit!" He will fight to the death.
Evuliban Dresnimn
Destruction Staff of Trifling Shock (7 dice, 18 yards)
Initiative 6
Speed 9
Defence 4
Health 7
Health 7
Magicka 13
Amulet of Sotha Sil
(+2 Magicka Trait)
Ring of Sotha Sil
(+1 Magicka Trait)
Novice Robes of Illusion
Once they are successful (presuming they are successful), the PCs are treated with a feast by the war fatigued Khajiit-y and their Headwoman Harrani is eager to see these matters settled and hopes there shall be no more excitement. If any of the Ebonheart Pact are in chains, rather than dead, she will gratefully take them and hold them bound and gagged until the next naval ship can take them back to Summerset Isles. The PCs are given the opportunity to return to Summerset Isles with that naval vessel and so ends the Khenarthi's Roost adventure.
No comments:
Post a Comment